*NOTE TO PILOTS* This following post contains nothing new that you haven't already learned. Feel free to skip this one. It is simply an explanation of Density Altitude to enlighten the non-pilot readers, which, I think at this point is all of them. ;)
Density Altitude is a phenomenon that is drilled into every pilot's head right from the start. Defined it would be the altitude that a given mass of air most closely resembles in terms of the air density of the Standard Atmosphere. Simply speaking, that means that if the density altitude of the air at sea level is 2000 ft, it more closely compares to the air density a Standard Atmosphere would have at 2000 ft. A Standard Atmosphere is simply the yardstick aviation uses to compare the properties of air from day to day. A Standard Atmosphere is where at sea level the air temperature is 15° C. Now as we know as air becomes warmer it becomes less dense. That would mean that a 20° C day would have a higher density altitude then a Standard Day. Humidity also affects density altitude - the more humid the air, the less dense it is.
This matters to pilots because an airplane's performance is very closely related to the density altitude. The thinner the air becomes, the less power the engines are able to produce, and the less lift the wings produce. Thin air can also be a good thing, because with it comes less drag, so airplanes are able to fly faster with less resistance meaning better fuel economy. Thinner air also means that all the V-speeds increase. Vs (Stall speed) is higher, Vy (Speed for best climb rate) is higher, Vr (takeoff rotation speed) is higher, etc. It is important to note that it is the True Airspeed (TAS) that is higher, the V speeds in terms of Indicated Airspeed (IAS), which is speed read off the the airspeed indicator, do not change. That is because all IAS is is a reading of pressure difference between normal atmospheric pressure (static pressure) and the ram air pressure measured in the pitot tube. That means it doesn't matter if the air density changes, the difference stays the same. TAS is the speed at which the airplane is actually moving through the air. TAS increases as Density Altitude increases.
This all means that in a high Density Altitude situation, like on a hot 30° C, high humidity day, the airplane is going to be producing less power, and need to accelerate to a higher True Airspeed to take-off. Climb Performance will also suffer. That is why the effects of Density Altitude are drilled into pilot's heads. If they do not calculate the Density Altitude, and apply it to their airplane, they could very well end up expecting the airplane to perform better then it is able, resulting in running out of runway on take-off, or not being able to climb above the trees in time. When an airplane's ceiling is mentioned, that altitude is in Density Altitude. The airplane doesn't really care what altitude it actually is at, only the altitude it thinks its at. If we're overflying a mountainous ridge for example, with the peak at 12000' true altitude, and the airplane's ceiling is listed as 14,000', on a Standard Day of 15° the airplane should be able to fly over the mountains, but if its a hot, humid day, with a Density altitude at sea level of 3000', that means the airplane will perform as if its 3000' higher then it actually is. Meaning it will only be able to climb to 11,000' and it won't make it over the 12,000' mountain.
Density Altitude is a very important concept for a pilot.
Tuesday, January 16, 2007
Balanced Field Length
There is a term in multi-engine flying called balanced field length. The balanced field length is the length of the runway required for a twin to operate safely with an engine failure at any point during the take-off phase. This is different then the more common "Takeoff Ground Run Distance" used in single engine flying. Takeoff Ground Run Distance is the minimum distance it takes an airplane (single or twin) to accelerate from 0 mph to when its wheels leave the ground. For the Cessna 150 at gross weight, at a sea level density altitude with zero headwind, the take-off distance is 735 ft. That means that in these conditions we should be able to use runways as small as 735 ft safely - if nothing goes wrong and the pilot does everything right on takeoff. In practice it is usually a good idea to stretch that length a little to leave some margin for error. Of course the more runway the better but endless amounts of runway is not always practical or possible. Therefore we use the takeoff ground-run distance, pulled off of a chart in the Pilot Operating Handbook, as a guideline as to how much runway we need.
Balanced field length is a little different then takeoff ground run distance. The Balanced field length as I mentioned at the beginning takes into account the runway needed to operate a twin engine airplane safely even if it were to have an engine failure at any point during the take-off. That means adding on extra runway length to account for having to stop the airplane if an engine were to fail during the takeoff roll on the ground, or in the case of larger airplanes, the extra length required to continue accelerating to takeoff if there is no longer enough distance to stop.
Larger airplanes use a pre-flight calculated V speed, denoted V1, as their takeoff decision speed. If an engine fails below this speed they are going slow enough and have enough runway to shut down the remaining engines and stop. Above this speed, and they no longer have the space to stop and are therefore committed to taking off, even if they're still on the ground. In a light twin such as ours, we don't use the V1 system because the airplane doesn't have the power to continue a takeoff on only one engine if we're still on the ground. This means that if we are still on the ground with an engine failure, we have no choice but to retard the throttles and stop. We may also even have to re-land and stop on the remaining runway if we have just taken off and have an engine failure before we have attained our best rate of climb speed and have the landing gear up. The landing gear down causes extra drag and our airplane may not be able to climb on only one engine with it down. Therefore our light twin balanced field length takes this into account. Many light twins have Accelerate-Stop charts in their Flight Manuals, which denote how much distance will be used to accelerate to a given airspeed, and then slow to a stop. My Twin Comanche doesn't have a chart like this, so we are forced to estimate it... OR, like I have just spent my entire last night doing, we can develop our OWN accelerate-stop distance charts using two different charts given in our Flight Manual, and a little math.
The chart I have just developed, I should point out, is an unapproved aircraft performance chart, and it has been untested. So I would certainly not wager mine or my passengers lives on it. It did however serve to be good brain excercise, and I do think it would probably fairly accurate if it actually was tested.
So here's what I did. Please any math/physics savey readers who have some suggestions/comments/rebutals, please, by all means, speak up. Anyways, my existing flight manual has two charts I used data from: Takeoff Ground Run Distance, which gives the distance required to accelerate to 80 mph and liftoff, and the Landing Ground Run Distance, which gives the distance required to stop given a touchdown speed of 70 mph. Now we can't really just add these two distances together, because they are in reference to two different speeds, and the resulting distance also wouldn't account for the extra distance we'd need if we were lifted-off, but still accelerating just above the the runway to our best rate of climb speed (Vy) of 112 mph, as is standard takeoff procedure (Accelerate to Vr of 80 mph, rotate and liftoff, accelerate just above the runway to Vy of 112 mph, climb out at that speed and retract the gear). So first of all we need to extrapolate the distances to a higher airspeed. To do this, we have to find our curve of acceleration, which I have charted on a Speed vs Distance graph. Since we know the engines are outputting a constant force, and we know that as speed increases, drag increases to the square of speed, so I think a curve somewhere along the lines of D=V^2 should be a good representative of both acceleration and deceleration seperately, where D equals distance travelled and V equals aircraft speed. I also had to calculate a stretch factor to make the curve fit the data given in the Flight Manual. To do that I used the speed given, divided by the distance given to calculate a stretch factor to make the curve fit the data. I then divided the stretch factor into the calculated speed, giving me this:
Dc = Vc^2/(Vg^2/Dg)
Where:
Dc = Distance calculated
Vc = Speed calculated
Vg = Speed given in charts
Dg = Distance given in charts
Now I can go to the charts in the flight manual to look up the distance needed to accelerate to 80 mph with a given aircraft weight in a given density altitude, to calculate the estimated distance to accelerate to a higher airspeed. For my chart I chose to calculate the distance needed to accelerate to 100 mph. I chose that airspeed because our best rate of climb with a single engine operating is 105 mph, so below that we would have to be able to stop, above 100 mph, we should be able to accelerate the last 5 mph and climb out.
So then I had to go through each density altitude and weight combination listed in the flight manual charts, find the resulting distance to accelerate to 80 mph, and plug that into my formula. Example:
2000 ft density altitude, at gross weight, showed 1500 ft ground roll to 80 mph.
Dc = Vc^2/(Vg^2/Dg)
Dc = 100^2/(80^2/1500)
Dc = 2344 ft required to accelerate to 100 mph.
I then used virtually the exact same method to calculate stopping distance from 100 mph, and added the accelerate and stop distances together, to get my estimated balanced field length.
That would mean that IF (big if) the formula is correct, I would be able to use a runway as short as the calculated balanced field length and I could have an engine failure at any point during the take-off and still have enough runway to safely land and stop below 100 mph or climb away above that speed.
Like I said that was simply a problem I did for fun and there is no guarentee those numbers are correct even IF my understanding of math and physics is correct. So I would never actually try to pass them off as true, and wouldn't recommend myself or anyone else try to use this method.
Saturday, January 13, 2007
Bad Habits
I went twin flying again this Friday during my lunch. The weather was a 1600 ft ceiling, and we had some light rain here and there, so we just did circuits. Runway 27 at London is long enough for touch and goes, so that's what we were doing.
The proper procedure for touch and goes is fairly simple, after all three wheels are down, flaps come up, and you go to full power and start your takeoff again, without stopping. I learned a hard lesson about procedures done in the right order. Flying touch and goes in the Cessna 150, the proper procedure is still flaps up, power to full (and then carb heat as well), but since its a slower airplane, with less power, and less travel throttle, you can sometimes get away with going to full power first, and then bringing the flaps up. That's simply because it doesn't take very long to push the power in and a Cessna 150 doesn't accelerate very fast either, so there's plenty of time to do it in either order before the airplane wants to go flying. However in the Comanche, the process of going to full power takes around 4-5 seconds from idle, and the airplane accelerates very rapidly.
Now this landing yesterday I had just touched down with a little bit of power, and while we were rolling along, I decided I'd push the power forward first and get us accelerating first to save us runway and then I'd bring up the flaps. That was my first mistake. As we started to accelerate and my hand was still on the throttle the airplane started to veer back and forth almost uncontrollably left and right. What was happening was what's called wheelbarrowing. That is when the weight comes off the main wheels, or off the ground completely, and shifts to the nose wheel. This can happen in any airplane from the pilot trying to hold it on the ground when the airplane wants to go/stay flying. In the Comanche due to the nosegear being longer then the mains, it can also happen if you try to takeoff with flaps. Normally in the Twin Comanche with no flaps rotation speed is around 90 mph, and the airplane will come off the ground with very little back pressure. So since we had the flaps down, it was trying to come off the ground much slower. It was essentially lifting most of the weight off the main wheels but keeping the nose down, since flying with flaps causes a much more nose down attitude. If I had immediately recognized my mistake I could have given some back pressure, gotten airborne, and we'd have gone flying. Instead I fought to maintain control on the ground because we hadn't reached the Vr (rotation speed) I had in my head. As this was all going on I think I said something like this, "Power to full... whoa... what the heck is happening!? ... flaps up!" My instructor, Richard, answered my question about the same time I did, and he flicked the flaps up for me. At that point we became airborne and everything turned out ok. I turned to Richard after during the climbout and said sheepishly, "That was pretty scary!". He just smiled at me and didn't say anything, aware that I knew where I had gone wrong.
That was a little bit of a lesson the hard way on bad habits. Flying a slow, forgiveable airplane its easy to get into bad habits, like following procedures in the wrong order. A Cessna 150 will let you get away with it, but a faster airplane like the Twin Comanche will bite you. The moral of the story is follow the proper procedures in the right order!
Wednesday, January 10, 2007
How different wing types affect handling
The shape of an airplane's wing can do a whole lot for how an airplane performes, and handles. Aircraft designers take into the account the aircraft's mission: Trainer, cross country machine, aerobatic aircraft, or in many cases some combination between two, or all of those categories.
 The wing camber refers to the shape of the wing if you were looking at it from the end. A high cambered wing is very curved on the top, and thick from top to bottom, whereas a low camber refers to a very flat wing. A common misconception is that a high cambered wing produces more lift. While this is right I suppose in a roundabout way, that specific wording is rather misleading. The thicker camber improves airflow at high angles of attack, therefore a thicker wing will be able to fly at a higher angle of attack without stalling. The higher angle of attack is what actually produces more lift. Camber can also be on the bottom of the wing, which improves airflow when the wing is inverted during aerobatic flight. A camber is NOT required to produce lift. Another flat out wrong concept that is taught is that the air on the top of the wing has to meet up with the air on the bottom. That's not true, in fact, since the air on the top is accelerated, it actually ends up further back then the air on the bottom. This is due to a concept called circulation, which I am not going to take the time to explain. For more information, check out this great website.
So a thicker camber has two effects: It allows the aircraft to fly at higher angles of attack which produces more lift - and it also increases drag. A thinner camber is just the opposite, less lift, less drag. The more lift a wing produces, the slower the stall speed will be.
The wing chord refers the distance between the leading edge and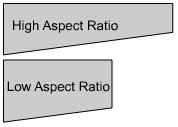 trailing edge of the wing. And the aspect ratio refers to the ratio between the wing chord and wing length. A high aspect ratio, between a long, thin wing (from front to back) actually produces LESS induced drag (drag produced as a side-effect of lift) then a low aspect ratio wing. That's why you always see gliders with incredibly long, thin wings, to produce the most lift possible with the least amount of drag. The shorter wing in a low aspect configuration generally gives greater roll rates, and the shorter wing means stronger construction.
There is one last term we'll go over before we start putting together all these different aspects of wing design together. That is wing washout. A washed out wing has a certain amount of twist built into it. The farther you get to the tip, the more the wing is twisted with its leading edge down. What this serves to do is increase the angle of attack of the wing near its root, and decrease it near the tips. Now if you remember, a wing will stall at a certain angle of attack, usually around 16-18 degrees (depending on the camber). That means that if the wing root has a greater angle of attack, it will stall first, and then the stall will work its way out to the tips. This has two advantages: The ailerons, which are on the outermost portion of the wing, will still have an affect even when the innermost portion of the wing has stalled. This helps to maintain control of the aircraft. Also, it makes for a much gentler stall when part of the wing stalls first, and the stall works its way across the rest of the wing. This is preferable to the entire wing stalling at the same time, and dropping like a rock. Nearly all wings have some sort of washout designed into them, and its disadvantages, as far as practical flight handling goes, are negligable. Therefore this is far as they will be discussed at this point.
Airplanes designed as a high speed cross country machine usually use high-aspect ratio, low camber wings. The long slender, thin airfoil gives lots of lift and very little drag; perfect for efficient cruising, however the sacrifice is made in slow speed handling and can often be tricky to l and. The thin camber generally gives abrupt, unforgiving stalls at higher airspeeds then a thicker camber, and the minimized drag means it takes a long time to slow down. This requires more planning during the landing phase. It also means that if airspeed is not precisely controlled, a too fast approach will cause the airplane to float in the flare, chewing up runway until the airspeed dissipates. The Piper Twin Comanche, and any Mooney aircraft are great examples of high-aspect, low camber wings.
 The wing camber refers to the shape of the wing if you were looking at it from the end. A high cambered wing is very curved on the top, and thick from top to bottom, whereas a low camber refers to a very flat wing. A common misconception is that a high cambered wing produces more lift. While this is right I suppose in a roundabout way, that specific wording is rather misleading. The thicker camber improves airflow at high angles of attack, therefore a thicker wing will be able to fly at a higher angle of attack without stalling. The higher angle of attack is what actually produces more lift. Camber can also be on the bottom of the wing, which improves airflow when the wing is inverted during aerobatic flight. A camber is NOT required to produce lift. Another flat out wrong concept that is taught is that the air on the top of the wing has to meet up with the air on the bottom. That's not true, in fact, since the air on the top is accelerated, it actually ends up further back then the air on the bottom. This is due to a concept called circulation, which I am not going to take the time to explain. For more information, check out this great website.
So a thicker camber has two effects: It allows the aircraft to fly at higher angles of attack which produces more lift - and it also increases drag. A thinner camber is just the opposite, less lift, less drag. The more lift a wing produces, the slower the stall speed will be.
The wing chord refers the distance between the leading edge and
 trailing edge of the wing. And the aspect ratio refers to the ratio between the wing chord and wing length. A high aspect ratio, between a long, thin wing (from front to back) actually produces LESS induced drag (drag produced as a side-effect of lift) then a low aspect ratio wing. That's why you always see gliders with incredibly long, thin wings, to produce the most lift possible with the least amount of drag. The shorter wing in a low aspect configuration generally gives greater roll rates, and the shorter wing means stronger construction.
There is one last term we'll go over before we start putting together all these different aspects of wing design together. That is wing washout. A washed out wing has a certain amount of twist built into it. The farther you get to the tip, the more the wing is twisted with its leading edge down. What this serves to do is increase the angle of attack of the wing near its root, and decrease it near the tips. Now if you remember, a wing will stall at a certain angle of attack, usually around 16-18 degrees (depending on the camber). That means that if the wing root has a greater angle of attack, it will stall first, and then the stall will work its way out to the tips. This has two advantages: The ailerons, which are on the outermost portion of the wing, will still have an affect even when the innermost portion of the wing has stalled. This helps to maintain control of the aircraft. Also, it makes for a much gentler stall when part of the wing stalls first, and the stall works its way across the rest of the wing. This is preferable to the entire wing stalling at the same time, and dropping like a rock. Nearly all wings have some sort of washout designed into them, and its disadvantages, as far as practical flight handling goes, are negligable. Therefore this is far as they will be discussed at this point.
Airplanes designed as a high speed cross country machine usually use high-aspect ratio, low camber wings. The long slender, thin airfoil gives lots of lift and very little drag; perfect for efficient cruising, however the sacrifice is made in slow speed handling and can often be tricky to l
 and. The thin camber generally gives abrupt, unforgiving stalls at higher airspeeds then a thicker camber, and the minimized drag means it takes a long time to slow down. This requires more planning during the landing phase. It also means that if airspeed is not precisely controlled, a too fast approach will cause the airplane to float in the flare, chewing up runway until the airspeed dissipates. The Piper Twin Comanche, and any Mooney aircraft are great examples of high-aspect, low camber wings.
Airplanes designed to have friendlier handling characteristics often sacrifice efficiency and speed during the cruise. Training aircraft like the Piper Tomahawk and many "step-up" aircraft like the Piper Arrow I and II use a low aspect ratio, high camber wing. The thicker camber may limit the cruise speed a little bit more, but these airfoils make for a more docile airplane. Stalls occur at a much slower speed, and are less violent of an event. The drag caused by the thicker profile and 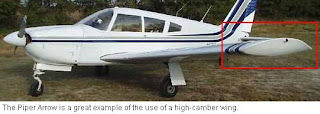 higher induced drag cause the airplane to slow down much quicker, and the short wings will make it sink faster. This makes the landing phase much easier to deal with. Less then perfect airspeed control is not as much of an issue since excess airspeed will be bled off much quicker, giving a greater margin for error.
 higher induced drag cause the airplane to slow down much quicker, and the short wings will make it sink faster. This makes the landing phase much easier to deal with. Less then perfect airspeed control is not as much of an issue since excess airspeed will be bled off much quicker, giving a greater margin for error.
If its load hauling you want the high-camber, high aspect wing ratio is the way to go, like on the Piper Aztec. The high camber allows higher angles of attack translating into more lift, and the high aspect ratio helps maximize lift while minimizing drag.
So designers take into account what mission they believe the aircraft primarily be serving in: Trainer, High Speed Cruiser, Load Hauling, or a step-up airplane somewhere in between. And we as pilots can often tell how the airplane will handle and perform just by looking at the wing and understanding how it works.
Monday, January 8, 2007
Mixture Pitch Power, Gear and Flaps Up, Identify, Verify, Feather.
If you read the title then you've just learned the procedure for dealing with an engine failure in a light twin. I went flying on Sunday and we did a couple circuits, then practiced our emergency procedures. My landings are coming along quite well I must say. Out of the four we did I can honestly say I greased two of them, and the other two weren't perfect, but still well within acceptable parameters. Now I need to start working on touching down within the landing zone I shoot for.
My emergency procedures still need some work. The little rhythmic mantra of "mixtures, pitch, power, gear and flaps up, identify, verify, feather" refers to the memory checklist we need to carry out immediately following an engine failure. 'Mixtures' means we push the mixture controls full forward to the full rich setting. 'Pitch' means we set the pitch of the props forward to full fine, and 'Power' means we immediately go to full power. Basically all the levers on the throttle quadrant go forward. After that we want to clean the airplane up aerodynamically, meaning we raise the landing gear and flaps, if they're down. Now we check to make sure there's no engine fire, and 'Identify' the failed engine. To identify we use the phrase "Dead foot, dead engine". That means that since we are now in an asymetrical thrust situation, we're going have to be using a substantial amount of rudder to counter-act the off-balance thrust and keep us heading in a straight line. This means that the foot that is NOT pushing agains the rudder pedals, means that is the side that has the failed engine. Dead foot, dead engine. Now we need to 'Verify' that conclusion with the engine guages. What is the Manifold Pressure and Tach saying? Now that we have verified the failed engine, we need to "Feather" it. Feathering refers to setting the pitch of the props to full coarse, so they're aligned into the airflow to give us the least amount of drag possible. Mixture, pitch, power - gear and flaps up - identify, verify, feather.
At this point in the process we need to do a cause check to try and find the problem. Make sure our fuel selectors are selected on a tank that has fuel in it, electric fuel pumps get switched on in case an engine driven fuel pump has failed, and we'll open the alternate engine intake air just in case the engine has been choked out with some ice. We'll now attempt a restart. If that doesn't work and we're resigned to the the fact that we are now flying on only one engine, we'll secure the dead engine. That means shutting off the fuel pumps, pulling the mixture control and throttle to idle-cutoff, and shutting off the magnetos and any accessories like generators/alternators on the dead engine. We also need to think about selecting the fuel tank on the side of the dead engine to crossfeed into the good engine. This will over time lighten up that wing and help to counter-act the tendancy to turn towards that side due to the asymetric thrust we're dealing with.
And that's it. I still need work on burning that procedure into my brain and into my muscle memory. I need to be able to go through that whole thing quickly and smoothly without the need to think about it. Any time lost during that procedure may mean altitude and control of the aircraft lost. This is especially critical during the take-off phase where I'm still flying low to the ground, and relatively slow. The lives of myself and my passengers may very well depend on how quickly and efficiently I can carry out that procedure - so it needs to be perfect, and taken very seriously.
Onto a different topic. Pilots who don't follow proper circuit procedures, really drive me crazy, so beware, I'm about to start a rant. We were doing circuits in the Twin Comanche at Huron Airpark in Centralia, and we in our left downwind. We heard a garbled, unreadable radio call, which I disregarded because I couldn't understand a word of it. Shortly after, I looked back to just catch the flash of a yellow piper cub pass directly over top of us from right to left, with what must have been less then 200 ft of clearance. He must not have seen us. Now I admit it can sometimes be difficult to spot other airplanes, especially relatively fast ones. He then proceeded to descend down to our height, circuit altitude, and from about mid-downwind, turned right and joined the downwind... from the downwind side! For those unfamiliar with traffic pattern procedures, that is a HUGE NoNo! Its also unsafe. Let me explain why: You don't do that because there could be an airplane in the downwind already and you might not see him thus causing a risk of collision! Hey wait a second... there WAS an airplane in the downwind! US!!! What a retard, pilots like that should not be licensed if they want to disregard the safety of themselves and others out of pure laziness. If I remembered his registration I would have reported him. This maneuver slipped himself to the inside and essentially ahead of us, who were technically first in line to land. Despite the fact that he managed to land and clear the runway in enough time that it did n't affect us, that is still VERY poor airmanship, and also very rude. Ok I'm calm now. The proper way one should enter the circuit from the downwind side of the airport (in a left hand circuit) is to angle your approach a ways to the left of the airport, then join the downwind leg straight in. Note the green arrows in the diagram. The red arrow is the path the menacing HACK took. This is a good example of why we always have to keep our eyes outside the cockpit and looking around. Sometimes the only person you can trust to maintain a level of safety is yourself.
My emergency procedures still need some work. The little rhythmic mantra of "mixtures, pitch, power, gear and flaps up, identify, verify, feather" refers to the memory checklist we need to carry out immediately following an engine failure. 'Mixtures' means we push the mixture controls full forward to the full rich setting. 'Pitch' means we set the pitch of the props forward to full fine, and 'Power' means we immediately go to full power. Basically all the levers on the throttle quadrant go forward. After that we want to clean the airplane up aerodynamically, meaning we raise the landing gear and flaps, if they're down. Now we check to make sure there's no engine fire, and 'Identify' the failed engine. To identify we use the phrase "Dead foot, dead engine". That means that since we are now in an asymetrical thrust situation, we're going have to be using a substantial amount of rudder to counter-act the off-balance thrust and keep us heading in a straight line. This means that the foot that is NOT pushing agains the rudder pedals, means that is the side that has the failed engine. Dead foot, dead engine. Now we need to 'Verify' that conclusion with the engine guages. What is the Manifold Pressure and Tach saying? Now that we have verified the failed engine, we need to "Feather" it. Feathering refers to setting the pitch of the props to full coarse, so they're aligned into the airflow to give us the least amount of drag possible. Mixture, pitch, power - gear and flaps up - identify, verify, feather.
At this point in the process we need to do a cause check to try and find the problem. Make sure our fuel selectors are selected on a tank that has fuel in it, electric fuel pumps get switched on in case an engine driven fuel pump has failed, and we'll open the alternate engine intake air just in case the engine has been choked out with some ice. We'll now attempt a restart. If that doesn't work and we're resigned to the the fact that we are now flying on only one engine, we'll secure the dead engine. That means shutting off the fuel pumps, pulling the mixture control and throttle to idle-cutoff, and shutting off the magnetos and any accessories like generators/alternators on the dead engine. We also need to think about selecting the fuel tank on the side of the dead engine to crossfeed into the good engine. This will over time lighten up that wing and help to counter-act the tendancy to turn towards that side due to the asymetric thrust we're dealing with.
And that's it. I still need work on burning that procedure into my brain and into my muscle memory. I need to be able to go through that whole thing quickly and smoothly without the need to think about it. Any time lost during that procedure may mean altitude and control of the aircraft lost. This is especially critical during the take-off phase where I'm still flying low to the ground, and relatively slow. The lives of myself and my passengers may very well depend on how quickly and efficiently I can carry out that procedure - so it needs to be perfect, and taken very seriously.
Onto a different topic. Pilots who don't follow proper circuit procedures, really drive me crazy, so beware, I'm about to start a rant. We were doing circuits in the Twin Comanche at Huron Airpark in Centralia, and we in our left downwind. We heard a garbled, unreadable radio call, which I disregarded because I couldn't understand a word of it. Shortly after, I looked back to just catch the flash of a yellow piper cub pass directly over top of us from right to left, with what must have been less then 200 ft of clearance. He must not have seen us. Now I admit it can sometimes be difficult to spot other airplanes, especially relatively fast ones. He then proceeded to descend down to our height, circuit altitude, and from about mid-downwind, turned right and joined the downwind... from the downwind side! For those unfamiliar with traffic pattern procedures, that is a HUGE NoNo! Its also unsafe. Let me explain why: You don't do that because there could be an airplane in the downwind already and you might not see him thus causing a risk of collision! Hey wait a second... there WAS an airplane in the downwind! US!!! What a retard, pilots like that should not be licensed if they want to disregard the safety of themselves and others out of pure laziness. If I remembered his registration I would have reported him. This maneuver slipped himself to the inside and essentially ahead of us, who were technically first in line to land. Despite the fact that he managed to land and clear the runway in enough time that it did
 n't affect us, that is still VERY poor airmanship, and also very rude. Ok I'm calm now. The proper way one should enter the circuit from the downwind side of the airport (in a left hand circuit) is to angle your approach a ways to the left of the airport, then join the downwind leg straight in. Note the green arrows in the diagram. The red arrow is the path the menacing HACK took. This is a good example of why we always have to keep our eyes outside the cockpit and looking around. Sometimes the only person you can trust to maintain a level of safety is yourself.
Pilot Terms
I've been realizing I've been using a lot of terms in my blog that all may make sense to a pilot, but perhaps be a little obscure to any non-pilot reading. Therefore this is simply a glossary of commonly used flying terms to help make my posts a little clearer to any non-pilots reading.
Angle of Attack - The angle the wing strikes the airflow. With the exception of vertical flight, an airplane will ALWAYS fly with a positive angle of attack, usually somewhere between 5-16 degrees. The more an airplane slows down, the greater its angle of attack will become. Up until the stalling angle (usually around 16-18 degrees), the greater the angle of attack, the greater the lift a wing produces.
ATC - Air Traffic Control.
Attitude - The angle between the aircraft's longitudinal (lengthwise) axis and the horizon. As seen from the cockpit it is how high up or down the nose of the aircraft is pointing. It can also be in reference to the aircraft's roll attitude as well as pitch attitude. If the nose of the aircraft is point above the horizon, it is in a 'nose up' attitude.
Circuit - This is a box pattern that is used to organize the flow of traffic around an airport. Typically circuits are all left turns. Each side of the box is named, and is flown in reference to the direction of the runway in use. If you were to fly one complete circuit, that would include, taking off, and climbing up to a 1000 ft above airport elevation on the 'departure leg'. Then you'd turn left 90 degrees and fly the 'crosswind leg'. Your next 90 degree turn would put you on the 'downwind leg', parallel to the runway and in the opposite direction of your take-off. Left again would put you onto your 'base leg', and one final turn would once again line you up with the runway and put you on the 'final leg'. Every airplane taking off and landing has to observe certain rules involved with joing, flying, and departing the traffic circuit.
CPL - Commercial Pilot License
IFR - Instrument Flight Rules. All pilots flying according to IFR are flying by reference to their instruments. They may fly through and above clouds, and don't have to see the ground. Airlines always fly IFR.
PPL - Private Pilot License
Stall - This is when a wing has an angle of attack too great to produce lift, and the airplane's nose will pitch down into a dive. The term 'stall' has nothing to do with the engine.
Stalling Angle - The angle of attack of which the airflow over the wing becomes turbulent and stops producing lift. Every airplane has a stalling speed which corresponds to the stalling angle.
VFR - Visual Flight Rules. All pilots flying according to VFR are flying visually. They cannot fly through clouds, or above the clouds if they can't see the ground. Different to IFR (Instrument Flight Rules)
V-speeds - Airplanes all have certain airspeeds defined for certain things, and are referenced as V-speeds. For example, Vy (which should be written as an uppercase V with a subscript y) is the speed at which an aircraft will climb at its best rate. A Piper Twin Comanche's Vy is 112 mph. This means that if pitch the nose up until the airplane slows to 112 mph, we will be climbing at the fastest possible rate for that power setting. Other common examples of V-speeds include: Vr - Take-off Rotation speed, Vs - Stall speed, Vne - Never exceed speed.
Saturday, January 6, 2007
Landing Gear Problems
Last time I went twin flying I got a first hand lesson on mid-air landing gear troubleshooting and procedures. We were practicing slow flight, which involved extending the landing gear, and we didn't get a green light indication. On my Twin Comanche, since its an older airplane, only has one green light to indicate all three gear are locked instead of the now standard three green lights. So we didn't know which of the landing gear was having problems, if any. Most often its a problem with the indicating system, not the actual gear. In this case it turned out to be a broken wire in the indicating system, but there was no way to know that in the air, so we took steps to verify where the problem was. First we tried cycling the landing gear through up and down, but that didn't fix it. I could see the reflection of the nose gear in the landing gear mirror, so the nose was down. At this point visions of gear-up landings start flashing through my head, which horrified me, seeing as it was my own airplane I was flying. I really needed to work to keep a calm and rational thought pattern. Richard, my instructor, didn't seem the least bit agitated, so it helped to draw from his level-headedness. We just needed to work through the problem. We unscrewed the indicating lights and switched them around to see if the bulb was just burnt out. No dice. At this point we did a crew briefing on the emergency gear extension handle. There is a panel in the floor between the seats that opens up. Inside is the landing gear worm gear. Manually extending the landing gear is a matter of disengaging the worm gear, putting the handle (a metal bar) into its slot, and pushing forward. This manually pushes the gear into the down position. And must be done slower then 100 mph. Hopefully we wouldn't have to use it.
At this point we were near the control zone, so we called the tower and informed them of the problem and asked for a flyby before joining the circuit. They asked us for the number of people onboard and amount of fuel in lbs we had. They also notified the airport fire department, which had trucks waiting for us when we landed. On the flyby the tower said that all three gear 'appeared' down and locked. They say the word appear for liability sake. We joined the circuit and did our pre-landing checks.
It was a beautiful feeling to touch down and feel the wheels beneath us, and since it all turned out ok, it was a good experience. I got a firsthand lesson in landing gear procedures, and I think it was also really good practice in emotional control. Regardless of the problem its always best to keep a level head and work through the problem calmly and rationally.
Friday, January 5, 2007
CPL Written
Today I passed my Commercial Pilot Written Exam. My overall mark was a 77%, with an 80% in Air Law, 71% in Navigation, 78% in Meterology, and a 79% in General Knowledge. I'm pretty happy with that mark. It would have been nice to break the 80% barrier, but its a pretty tough exam, so I can't complain, and its a huge relief to have it over with and done. Now its time to get ready for the flight test.
I'm going twin flying this weekend, although the weather on Sat isn't looking too great, so I'm going to book some dual time for next weekend in the Cessna 150 to do a good review and start to get back up to speed.
Other then that not a whole lot of news to report, I just couldn't neglect updating my blog on my exam results. I'll post at the end of the weekend to report on how the twin training went.
Subscribe to:
Posts (Atom)


