Monday, January 8, 2007

Mixture Pitch Power, Gear and Flaps Up, Identify, Verify, Feather.

If you read the title then you've just learned the procedure for dealing with an engine failure in a light twin. I went flying on Sunday and we did a couple circuits, then practiced our emergency procedures. My landings are coming along quite well I must say. Out of the four we did I can honestly say I greased two of them, and the other two weren't perfect, but still well within acceptable parameters. Now I need to start working on touching down within the landing zone I shoot for.


My emergency procedures still need some work. The little rhythmic mantra of "mixtures, pitch, power, gear and flaps up, identify, verify, feather" refers to the memory checklist we need to carry out immediately following an engine failure. 'Mixtures' means we push the mixture controls full forward to the full rich setting. 'Pitch' means we set the pitch of the props forward to full fine, and 'Power' means we immediately go to full power. Basically all the levers on the throttle quadrant go forward. After that we want to clean the airplane up aerodynamically, meaning we raise the landing gear and flaps, if they're down. Now we check to make sure there's no engine fire, and 'Identify' the failed engine. To identify we use the phrase "Dead foot, dead engine". That means that since we are now in an asymetrical thrust situation, we're going have to be using a substantial amount of rudder to counter-act the off-balance thrust and keep us heading in a straight line. This means that the foot that is NOT pushing agains the rudder pedals, means that is the side that has the failed engine. Dead foot, dead engine. Now we need to 'Verify' that conclusion with the engine guages. What is the Manifold Pressure and Tach saying? Now that we have verified the failed engine, we need to "Feather" it. Feathering refers to setting the pitch of the props to full coarse, so they're aligned into the airflow to give us the least amount of drag possible. Mixture, pitch, power - gear and flaps up - identify, verify, feather.


At this point in the process we need to do a cause check to try and find the problem. Make sure our fuel selectors are selected on a tank that has fuel in it, electric fuel pumps get switched on in case an engine driven fuel pump has failed, and we'll open the alternate engine intake air just in case the engine has been choked out with some ice. We'll now attempt a restart. If that doesn't work and we're resigned to the the fact that we are now flying on only one engine, we'll secure the dead engine. That means shutting off the fuel pumps, pulling the mixture control and throttle to idle-cutoff, and shutting off the magnetos and any accessories like generators/alternators on the dead engine. We also need to think about selecting the fuel tank on the side of the dead engine to crossfeed into the good engine. This will over time lighten up that wing and help to counter-act the tendancy to turn towards that side due to the asymetric thrust we're dealing with.


And that's it. I still need work on burning that procedure into my brain and into my muscle memory. I need to be able to go through that whole thing quickly and smoothly without the need to think about it. Any time lost during that procedure may mean altitude and control of the aircraft lost. This is especially critical during the take-off phase where I'm still flying low to the ground, and relatively slow. The lives of myself and my passengers may very well depend on how quickly and efficiently I can carry out that procedure - so it needs to be perfect, and taken very seriously.


Onto a different topic. Pilots who don't follow proper circuit procedures, really drive me crazy, so beware, I'm about to start a rant. We were doing circuits in the Twin Comanche at Huron Airpark in Centralia, and we in our left downwind. We heard a garbled, unreadable radio call, which I disregarded because I couldn't understand a word of it. Shortly after, I looked back to just catch the flash of a yellow piper cub pass directly over top of us from right to left, with what must have been less then 200 ft of clearance. He must not have seen us. Now I admit it can sometimes be difficult to spot other airplanes, especially relatively fast ones. He then proceeded to descend down to our height, circuit altitude, and from about mid-downwind, turned right and joined the downwind... from the downwind side! For those unfamiliar with traffic pattern procedures, that is a HUGE NoNo! Its also unsafe. Let me explain why: You don't do that because there could be an airplane in the downwind already and you might not see him thus causing a risk of collision! Hey wait a second... there WAS an airplane in the downwind! US!!! What a retard, pilots like that should not be licensed if they want to disregard the safety of themselves and others out of pure laziness. If I remembered his registration I would have reported him. This maneuver slipped himself to the inside and essentially ahead of us, who were technically first in line to land. Despite the fact that he managed to land and clear the runway in enough time that it didn't affect us, that is still VERY poor airmanship, and also very rude. Ok I'm calm now. The proper way one should enter the circuit from the downwind side of the airport (in a left hand circuit) is to angle your approach a ways to the left of the airport, then join the downwind leg straight in. Note the green arrows in the diagram. The red arrow is the path the menacing HACK took. This is a good example of why we always have to keep our eyes outside the cockpit and looking around. Sometimes the only person you can trust to maintain a level of safety is yourself.

Pilot Terms

I've been realizing I've been using a lot of terms in my blog that all may make sense to a pilot, but perhaps be a little obscure to any non-pilot reading. Therefore this is simply a glossary of commonly used flying terms to help make my posts a little clearer to any non-pilots reading.

Angle of Attack - The angle the wing strikes the airflow. With the exception of vertical flight, an airplane will ALWAYS fly with a positive angle of attack, usually somewhere between 5-16 degrees. The more an airplane slows down, the greater its angle of attack will become. Up until the stalling angle (usually around 16-18 degrees), the greater the angle of attack, the greater the lift a wing produces.

ATC - Air Traffic Control.

Attitude - The angle between the aircraft's longitudinal (lengthwise) axis and the horizon. As seen from the cockpit it is how high up or down the nose of the aircraft is pointing. It can also be in reference to the aircraft's roll attitude as well as pitch attitude. If the nose of the aircraft is point above the horizon, it is in a 'nose up' attitude.

Circuit - This is a box pattern that is used to organize the flow of traffic around an airport. Typically circuits are all left turns. Each side of the box is named, and is flown in reference to the direction of the runway in use. If you were to fly one complete circuit, that would include, taking off, and climbing up to a 1000 ft above airport elevation on the 'departure leg'. Then you'd turn left 90 degrees and fly the 'crosswind leg'. Your next 90 degree turn would put you on the 'downwind leg', parallel to the runway and in the opposite direction of your take-off. Left again would put you onto your 'base leg', and one final turn would once again line you up with the runway and put you on the 'final leg'. Every airplane taking off and landing has to observe certain rules involved with joing, flying, and departing the traffic circuit.

CPL - Commercial Pilot License

IFR - Instrument Flight Rules. All pilots flying according to IFR are flying by reference to their instruments. They may fly through and above clouds, and don't have to see the ground. Airlines always fly IFR.

PPL - Private Pilot License

Stall - This is when a wing has an angle of attack too great to produce lift, and the airplane's nose will pitch down into a dive. The term 'stall' has nothing to do with the engine.

Stalling Angle - The angle of attack of which the airflow over the wing becomes turbulent and stops producing lift. Every airplane has a stalling speed which corresponds to the stalling angle.

VFR - Visual Flight Rules. All pilots flying according to VFR are flying visually. They cannot fly through clouds, or above the clouds if they can't see the ground. Different to IFR (Instrument Flight Rules)

V-speeds - Airplanes all have certain airspeeds defined for certain things, and are referenced as V-speeds. For example, Vy (which should be written as an uppercase V with a subscript y) is the speed at which an aircraft will climb at its best rate. A Piper Twin Comanche's Vy is 112 mph. This means that if pitch the nose up until the airplane slows to 112 mph, we will be climbing at the fastest possible rate for that power setting. Other common examples of V-speeds include: Vr - Take-off Rotation speed, Vs - Stall speed, Vne - Never exceed speed.

Saturday, January 6, 2007

Landing Gear Problems

Last time I went twin flying I got a first hand lesson on mid-air landing gear troubleshooting and procedures. We were practicing slow flight, which involved extending the landing gear, and we didn't get a green light indication. On my Twin Comanche, since its an older airplane, only has one green light to indicate all three gear are locked instead of the now standard three green lights. So we didn't know which of the landing gear was having problems, if any. Most often its a problem with the indicating system, not the actual gear. In this case it turned out to be a broken wire in the indicating system, but there was no way to know that in the air, so we took steps to verify where the problem was. First we tried cycling the landing gear through up and down, but that didn't fix it. I could see the reflection of the nose gear in the landing gear mirror, so the nose was down. At this point visions of gear-up landings start flashing through my head, which horrified me, seeing as it was my own airplane I was flying. I really needed to work to keep a calm and rational thought pattern. Richard, my instructor, didn't seem the least bit agitated, so it helped to draw from his level-headedness. We just needed to work through the problem. We unscrewed the indicating lights and switched them around to see if the bulb was just burnt out. No dice. At this point we did a crew briefing on the emergency gear extension handle. There is a panel in the floor between the seats that opens up. Inside is the landing gear worm gear. Manually extending the landing gear is a matter of disengaging the worm gear, putting the handle (a metal bar) into its slot, and pushing forward. This manually pushes the gear into the down position. And must be done slower then 100 mph. Hopefully we wouldn't have to use it.

At this point we were near the control zone, so we called the tower and informed them of the problem and asked for a flyby before joining the circuit. They asked us for the number of people onboard and amount of fuel in lbs we had. They also notified the airport fire department, which had trucks waiting for us when we landed. On the flyby the tower said that all three gear 'appeared' down and locked. They say the word appear for liability sake. We joined the circuit and did our pre-landing checks.

It was a beautiful feeling to touch down and feel the wheels beneath us, and since it all turned out ok, it was a good experience. I got a firsthand lesson in landing gear procedures, and I think it was also really good practice in emotional control. Regardless of the problem its always best to keep a level head and work through the problem calmly and rationally.

Friday, January 5, 2007

CPL Written

Today I passed my Commercial Pilot Written Exam. My overall mark was a 77%, with an 80% in Air Law, 71% in Navigation, 78% in Meterology, and a 79% in General Knowledge. I'm pretty happy with that mark. It would have been nice to break the 80% barrier, but its a pretty tough exam, so I can't complain, and its a huge relief to have it over with and done. Now its time to get ready for the flight test.

I'm going twin flying this weekend, although the weather on Sat isn't looking too great, so I'm going to book some dual time for next weekend in the Cessna 150 to do a good review and start to get back up to speed.

Other then that not a whole lot of news to report, I just couldn't neglect updating my blog on my exam results. I'll post at the end of the weekend to report on how the twin training went.

Thursday, December 7, 2006

Icing on the Cake

Its snowing out right now, and I can't go flying. Flying in the wintertime has both its pros and cons. Airplanes love cold air. Cold air is more dense, which allows the engine to produce more power. The dense air also provides more substance for the propellers and wings to displace, thus giving more thrust and more lift. In the Cessna 150 these effects are most visibly seen during a climb. On a hot summer day with just me in the airplane I can expect around a 3-400 ft/per min climb, whereas in colder winter weather I've see climbs upward of 600 fpm.

Winter flying also requires more cautious actions to avoid airframe icing. Airframe icing is defined as the buildup of ice on the wings and other surfaces of the aircraft, which can add weight to the airplane as well as reduce lift. In icing conditions, ice most heavily builds up on the leading edges of the wings and other surfaces of the airplane. Ice on the windscreen can impede forward visibility from the cockpit. More importantly, icing on the wings, if appropriate action is not taken, can actually bring an airplane down. The ice changes the shape of the wings, which alters how the air flows over it. This can reduce the amount of lift the wings produce.

All of the larger airliners have equipment to defend against icing, and many smaller aircraft have systems as well. There are 3 different types of ice protection systems, categorized into two different groups: De-icing, which is to remove ice that has already built up, and Anti-icing, which works to prevent ice buildup in the first place. De-icing boots are strips of rubber that are glued onto the leading edges of the wings and other flying surfaces. When ice accumulates on the boots, they can be inflated with air which breaks away the the ice so it falls away. This is by far the most common system employed on smaller business jets and piston planes. Less commonly seen is the weeping leading edge system. Like on the Cirrus line of private aircraft, the leading edge has a grid of tiny holes covering the entire leading edge. When activated, these 'pores' seep anti-icing fluid, which is spread by the airflow over the wing. This fluid prevents water droplets from freezing on the wing. Lastly, and only used on jet aircraft, is the hot-wing anti-icing system. The leading edge is heated from bleed air from the jet engines, which prevents icing from freezing onto the leading edges.

Neither of the airplanes I fly are equipped with de-icing, or anti-icing systems. Additionally, neither aircraft perform particularly well with ice, compared to other airplanes. The Cessna 150 is a very small, underpowered airplane. Do to the lack of power, it would not be able to handle the extra weight and decreased lift as well as more powerful airplanes could. The Twin Comanche, though having lots of power, has what is called a laminar flow wing. Simply speaking, it is critical for this type of wing to have a very smooth surface, free of any contamination. Ice on this wing would change the flow of air very drastically. This means that I have to be very cautious as to the weather conditions I fly into, and as such, I am not going flying today.

Wednesday, December 6, 2006

Landing a Twin

Well here is my post on landing the twin as promised. Hopefully I haven't lost too many people to confusion or boredom from the last post. I promise the next one will be less technical.

So here we are, screaming along in our twin. We've been cleared to the downwind, so now we're flying parallel to the runway in the opposite direction, at circuit altitude, which is 1000 ft above the airport. If we haven't already we'll pull the power back to around 17 " of Manifold Pressure, which is about half power, so we can slow down. We'll let our speed bleed off a little. Now we need to get our pre-landing check done. Mixtures go to full rich, fuel selectors should be on main tanks, electric fuel pumps on, and once our airspeed has dropped below 150 mph, we can drop the landing gear, and we'll watch for our green light, indicating the gear is down and locked. The gear will be slowing us down even more, so now once we're below 125 mph, we can lower the flaps.

At this point, we'll be ready to turn onto our base leg, which is 90 degrees to the runway. We slow down to our initial approach speed which will usually be 120 mph, unless we're following in a slower plane and we need to go slower to give them more spacing. Soon enough we'll be ready to turn onto our final leg, lining us up with the runway. I have to remember to not wait too long to turn, otherwise I'm going to turn too late, and have to do an S turn to get ourselves lined up again with the centreline. This isn't a Cessna 150 and it won't turn on a dime as I'm used to. Final approach speed will be 110 mph. Once we're established on final we do our G.U.M.P. check. G.U.M.P. is an acronym for Gas, Undercarriage (landing gear), Mixtures, and Propellers. This means we want to double check that our fuel pumps are on, and fuel selectors on the main tanks, our undercarriage is down and locked (belly landings are quite exciting I hear but not very cost-effective), Mixtures are rich, and Propellers are full forward. All this, with the exception of the landing gear, doesn't really matter a whole lot for landing, but we want to be already set up to climb out if we have to overshoot for whatever reason. So as long as we've been cleared to land we're good to go. All we have to do is fly the airplane down over the threshold, slowly retard the throttle and flare (raise the nose to bleed off our airspeed and touch down on the main wheels).

The flare I find is a much smaller angle in comparison to a Cessna 150 or 172. The airplane is travelling faster and needs more time to slow down and settle onto the runway. I initially had problems flaring too much, and the airplane would zoom up, bleed off its airspeed, and then drop onto the runway - hard on the airplane and it does a number on your back too! All we need is just a very slight nose up attitude and hold it there until our airspeed decreases and the airplane settles onto the runway. Once we've got all three wheels onto the runway its just a matter of applying the brakes and stopping straight ahead. Onto the ground once more safely and uneventfully, just the way we like it!

Tuesday, December 5, 2006

Flying a Twin

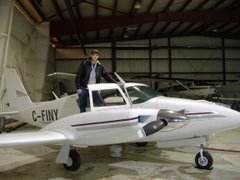
Recently I started training for my Multi-Engine Class Rating, in our newly christened 1964 Piper Twin Comanche. My first flight was quite the shock going from the ambling pace of a Cessna 150 straight to the high speed, high demand cockpit of a complex twin. So I am excited to review what I have learned so far.

Just a heads up, this is going to be a fairly technical post, so those not interested in reading procedures and what-not, sorry. Otherwise read on!

For those of you out there who know what a Constant Speed Propeller is, feel free to skip these next two paragraphs, I just feel compelled to give a little background knowledge to those unaquainted with the complex aircraft.

First of all the term "Complex Aircraft" generally refers to an aircraft with retractable landing gear and a constant speed propeller, or in my airplane's case, propellers plural. A constant speed propeller is one where you can control the pitch of the blades. This gives you an advantage similiar to different gears in a car. A fine pitch in the propeller, similiar to a low gear, will give us lots of torque for the take-off and climb, whereas a coarse pitch, like a high gear, will give us a fast cruising speed.

In addition to a power control (controls amount of air aloud into engine) and mixture control (controls amount of fuel aloud into engine) we have a a set of Propeller controls. These don't directly control the pitch of the propeller blades, but actually control a governor that allows the blades to change their pitch in order to hold a constant engine RPM as directed by the prop controls. Hence the name "constant speed propeller". The governor, based on how much power is being delivered to the props by the engine, will adjust the pitch of the blades to either slow down, or speed up the engine as needed to maintain the set RPM. For example. Say we want to set our props to a cruise setting, and right now we have just finished our climb and are in a fine pitch climb setting of 2500 RPM. We will pull back the prop control levers until the Tachometer reads our desired RPM, which we will call 2300. The governor senses that right now the props are spinning at a faster rate then 2300, so it increases the pitch, which in turn loads the engine and slows it down to 2300. If we were to increase the power being delivered to the props by pushing our throttle forward, the props will naturally want to speed up, so the governor will once again increase the pitch of the props in an attempt to keep them spinning at 2300 RPM. So unlike a fixed pitch prop aircraft where power to the engine is measured on the Tachometer, we measure power from the Manifold Pressure Gauge, in Inches of Mercury, and we manage the prop settings using our Tachometer.

Now that we have a little background knowledge, I can talk about the procedures we use for taking off.

For taking off we use a full fine pitch setting for the props, full power to the engines, and no flaps. The Twin Comanche calls for no flaps in take-off, because we don't want to take off while our airspeed is still below Vmc. In a nutshell, the aircraft will be uncontrollable below Vmc if an engine fails. So we want to stay above that at all times. Once we're cleared for take-off, and we've done our crew briefing and are ready to go, we push the power forward, and hold it on the runway centreline as we're sucked back into our seats. Right at about 80 mph, the airplane stops bouncing along the runway and starts flying. Now we'll accelerate in a level attitude just above the runway until we've past Vmc (90 mph) and reached our best rate of climb, which is 112 mph. At this point we'll pitch the nose up and climb out. As soon as we've run out of runway, which is about 5-10 seconds after our wheels left the ground, we transition into the normal climb. Landing gear goes up, we pull the power and props back to our climb setting, and we let our airspeed increase to around 130 to 140 mph for better cooling for the engines. Not long after, we've reached our cruising altitude, so its time for the cruise checklist. Power once again back to cruise power, electric fuel pumps can go off one at a time as we watch our fuel flow gauge for any decrease in fuel flow. If something is wrong with our engine driven fuel pumps we want to be able to identify which one, and if something is wrong with both of them it would also be really nice to not have both engines quit at the same time, cause that would just make for a bad day. The rest of the cruise checklist is pretty standard. Mixtures lean, fuel tank selectors as req'd (also done one at a time), cowl flaps closed, nav instruments set.

I'll post what we do for landing tommorrow maybe, because this is getting a little long and its also getting quite late, and I have to work tommorrow.