Hang around aviation even just a short while and you'll begin to realize there are two types of private pilots out there. The first type of pilot is the enthusiast pilot. He loves to fly, just for the sole reason of flying. He's the guy that you'll see out at the airport getting ready to go for the $100 hamburger. The hamburger sucks, and its overpriced, and a 100 miles away, but it gives him an excuse to fly. He may just be the occasional renter, an owner, or the old guy that always hangs out at the flight centre with a thousand cool story's to tell. This type just loves to fly, so that's why they do it. The second type or pilot is the type that has the intention of using it for travel. They fly for the utility of it - they want to get somewhere. I think there can be several dangerous traps for the second group of pilots.
That motivation of flying to get somewhere completely changes the type and frequency of flying between those who fly as transportation, and those who fly just because they love it. First of all, like I mentioned, the motivation to get somewhere prompts the purchase of a high performance airplane. A Cessna 150 is hardly useful for getting somewhere. Naturally the draw is towards faster, and inevitabley more complex and difficult airplanes. There is also another trap that can compound the problem. This pilot, who has just earned his Private Pilot License has grand plans of seeing the world using his new-found skill, and he purchases a sleek Mooney M20. But he only travels once a month or so, so he doesn't fly much. He's a conscientious pilot, and takes safety seriously, but the truth is his skills and experience level are likely far below the airplane he flies. Compare that to the recreational enthuisiast who loves to fly. He doesn't have a reason to go anywhere, except for maybe those hamburgers and the occasional fly-in during the summer, so he buys a Cessna 172, about the same time as the first pilot buys his Mooney. The C-172 is fun and friendly to fly, economical, and it can get somewhere in a reasonable amount of time if it has to. He's also out flying almost every weekend, even if its just to go poke around in the air for no good reason other then he just loves to be up there. He eats, sleeps, and breaths flying.
I think the difference between these two types is becoming clear. Skip ahead now a couple years in the lives of our two pilots. The enthusiast pilot with the C-172 has now amassed a considerable amount of flight time. He can fly the pants off that 172, has a good eye for weather, and he's collected a few of his own stories too. And now he's ready to move up to a more complex airplane that can once again challenge his skills. He goes for a test flight in a Mooney and after just an hour of flying in it he can fly the Mooney better then the pilot who has owned it for much longer.
The National Transportation Safety Board reports are riddled with low time pilots who have crashed their high-performance singles. I think the importance of experience in a simpler airplane shouldn't be overlooked by anyone. Even for someone interested in owning a fast cross country airplane should consider flying a simpler airplane for a considerable amount of time before stepping into something faster. Flying skills are very transferable between airplanes, and I think taking the long way and enjoying the journey before going all out is well worth the time.
Monday, February 12, 2007

Wednesday, February 7, 2007
Unlocking the Mystery
I take my Multi-Engine flight test this Saturday. I feel fairly confident, however I'm still going to try to get another flight sometime before then to go up with Richard and make sure everything is polished. I feel like right now I'm just starting to cross the threshold between having to consciously THINK about how to fly the airplane, and being able to fly the airplane instinctively. There's certainly a difference, and I started to notice it doing circuits on Sunday. I didn't have to consciously think as much about maintaining my altitude in the downwind or holding my airspeed during the approach, I just did it. Granted I am still a long ways from mastering the airplane, but the change towards that is starting to happen.
It reminds me of a certain memory I have during primary training. This happened more then four years ago now I think but I still remember the experience vividly. This was a fair amount of time before my solo. We were doing circuits in C-GEBW, the flight school's Cessna 150. I was at the point where I was just flying the airplane, and Paul would do the pre-landing check (Master on, Mags on, fuel selected on, carb heat hot, mixture rich) for me in the downwind and was probably dropping the flaps for me as well on the base leg. I remember I was concentrating very hard on holding my alititude and keeping a straight downwind leg, and Paul decided it was time for me to handle the entire workload. I called for the pre-landing check, and instead of agreeing it was time and doing it, he just said something like, "Why don't you do it this time?." So I said, "Ok, do you have [control of] the airplane?" He just declined to take control and said I was doing fine. The first time I felt a little overwhelmed - I have to FLY the airplane AND do the downwind check on my own!?! I chuckle at it now, because the pre-landing check in the 150 takes less then 5 seconds to do, so its really a non-event, but at the time it was a real challenge to carry that out while not letting the airplane wander at the same time. After a little more practice I soon learned to handle both tasks safely and efficiently. Its funny to look back and remember the challenge it was to fly a simple little C-150. Back then Cessna 150's were still complex and mysterious in my mind's eye. Now it seems like there is nothing to them. The challenge of unlocking that mystery is a richly rewarding process.
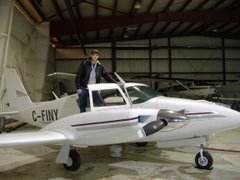
It has been the same with learning to fly the Twin Comanche, except on a slightly smaller scale. I remember my first flight in C-FINY when we were down in Texas looking at it as a possibility to buy it. It was thrilling to get to fly in it, and it was also so far above my head. The physics of single engine performance, like Vmc (Minimum controllable airspeed with one engine inop) and blue line (Vyse, airspeed for best rate of climb on one engine) were all a mystery to me, as was flying an airplane with a constant speed propellor and retractable landing gear. I had never done it before, and I hadn't a clue how any of it worked. Those mysteries are starting to be unlocked, but I still look forward to the time when I have completely mastered the airplane and can look back on this point and chuckle at how green I still was.
There are also more things that are still a mystery, like IFR flying that I can look forward to unlocking.
It reminds me of a certain memory I have during primary training. This happened more then four years ago now I think but I still remember the experience vividly. This was a fair amount of time before my solo. We were doing circuits in C-GEBW, the flight school's Cessna 150. I was at the point where I was just flying the airplane, and Paul would do the pre-landing check (Master on, Mags on, fuel selected on, carb heat hot, mixture rich) for me in the downwind and was probably dropping the flaps for me as well on the base leg. I remember I was concentrating very hard on holding my alititude and keeping a straight downwind leg, and Paul decided it was time for me to handle the entire workload. I called for the pre-landing check, and instead of agreeing it was time and doing it, he just said something like, "Why don't you do it this time?." So I said, "Ok, do you have [control of] the airplane?" He just declined to take control and said I was doing fine. The first time I felt a little overwhelmed - I have to FLY the airplane AND do the downwind check on my own!?! I chuckle at it now, because the pre-landing check in the 150 takes less then 5 seconds to do, so its really a non-event, but at the time it was a real challenge to carry that out while not letting the airplane wander at the same time. After a little more practice I soon learned to handle both tasks safely and efficiently. Its funny to look back and remember the challenge it was to fly a simple little C-150. Back then Cessna 150's were still complex and mysterious in my mind's eye. Now it seems like there is nothing to them. The challenge of unlocking that mystery is a richly rewarding process.
It has been the same with learning to fly the Twin Comanche, except on a slightly smaller scale. I remember my first flight in C-FINY when we were down in Texas looking at it as a possibility to buy it. It was thrilling to get to fly in it, and it was also so far above my head. The physics of single engine performance, like Vmc (Minimum controllable airspeed with one engine inop) and blue line (Vyse, airspeed for best rate of climb on one engine) were all a mystery to me, as was flying an airplane with a constant speed propellor and retractable landing gear. I had never done it before, and I hadn't a clue how any of it worked. Those mysteries are starting to be unlocked, but I still look forward to the time when I have completely mastered the airplane and can look back on this point and chuckle at how green I still was.
There are also more things that are still a mystery, like IFR flying that I can look forward to unlocking.
Saturday, February 3, 2007
Crosswind Landings
Being able to safely land an aircraft in a crosswind is a must for a pilot. It is actually a very rare day to have the wind directly aligned with the runway, so there's always at least a little crosswind component to the landing. What makes crosswind landings so tricky is drift. Let's say you have a runway running North/South, and you're landing in the magnetic North direction (that means the runway would be called 36. North=360°=36). So we're landing on runway 36, and the wind is out of the west, or 270°. That gives us a 90° crosswind. In order to align ourselves with the runway, we're going to have to point the nose of the aircraft into the wind slightly. The problem this creates is that now the wheels are no longer going to touch down straight, which can impose side loads on the tires, contribute to premature tire wear, and could also make it very difficult to maintain directional control once we've touched down.
There's two techniques you can use to correct this: The crab method and the wing low method. The crab method is much more difficult and requires precise timing with small aircraft (larger jets have a better time using this), so it is not often used. The wing low method is mainly what is being taught for light aircraft, so that is the method I'll explain.
To align the wheels when landing using the wing low method requires the use of both aileron and rudder. You use the ailerons to bank into the wind, and then opposite rudder to align the nose with the runway. This results in the upwind wing being slightly lower then the other one, which also means that the upwind wheel will touch down first. Naturally the stronger the crosswind the more crosswind correction is required, and the more difficult it becomes.
Today I went up for another lesson in the Twin Comanche. We just reviewed the usuals: steep turns, engine failure in cruise, and engine failure in the overshoot. We also did some circuits, and the air was incredibly bumpy, and the crosswind was nuts too. We were using runway 27 with the winds at 230° at 22 kts gusting to 27. That works out to about a 14 to 17 knot crosswind. Officially the strongest crosswind I've ever flown in. The crosswinds were just about at my personal limits, and they were just on the verge of the airplane's limits too. Richard said I did very well. One landing I had to use full rudder deflection to keep the wheels straight and tracking the runway as we touched down, and it was difficult to maintain directional control after touchdown before we had slowed completely as well. I wouldn't call those crosswind conditions fun, but they were certainly a challenge I was glad I took on. It was quite the adrenaline rush.
With gusty conditions it is impossible to hold the nose steadily aligned with the runway, so timing becomes more critical as you try to touch down at the moment the nose is aligned properly. Your feet are on the rudder pedals kicking back and forth trying to counteract the wind gusts, your right hand is ready on the throttles, and the left hand is on the yoke working the ailerons opposite to rudder direction and making pitch adjustments to keep the airplane in the flare ready to touch down as soon as the nose is straight. Its important that we don't let the airplane touch down until the wheels are aligned with the direction of motion, and its tricky when the wind gusts are blowing the nose back and forth. Quite the challenge, but those are the moments pilots live for - to conquer the airplane even when the elements turn against us.
There's two techniques you can use to correct this: The crab method and the wing low method. The crab method is much more difficult and requires precise timing with small aircraft (larger jets have a better time using this), so it is not often used. The wing low method is mainly what is being taught for light aircraft, so that is the method I'll explain.
To align the wheels when landing using the wing low method requires the use of both aileron and rudder. You use the
 ailerons to bank into the wind, and then opposite rudder to align the nose with the runway. This results in the upwind wing being slightly lower then the other one, which also means that the upwind wheel will touch down first. Naturally the stronger the crosswind the more crosswind correction is required, and the more difficult it becomes.
Today I went up for another lesson in the Twin Comanche. We just reviewed the usuals: steep turns, engine failure in cruise, and engine failure in the overshoot. We also did some circuits, and the air was incredibly bumpy, and the crosswind was nuts too. We were using runway 27 with the winds at 230° at 22 kts gusting to 27. That works out to about a 14 to 17 knot crosswind. Officially the strongest crosswind I've ever flown in. The crosswinds were just about at my personal limits, and they were just on the verge of the airplane's limits too. Richard said I did very well. One landing I had to use full rudder deflection to keep the wheels straight and tracking the runway as we touched down, and it was difficult to maintain directional control after touchdown before we had slowed completely as well. I wouldn't call those crosswind conditions fun, but they were certainly a challenge I was glad I took on. It was quite the adrenaline rush.
With gusty conditions it is impossible to hold the nose steadily aligned with the runway, so timing becomes more critical as you try to touch down at the moment the nose is aligned properly. Your feet are on the rudder pedals kicking back and forth trying to counteract the wind gusts, your right hand is ready on the throttles, and the left hand is on the yoke working the ailerons opposite to rudder direction and making pitch adjustments to keep the airplane in the flare ready to touch down as soon as the nose is straight. Its important that we don't let the airplane touch down until the wheels are aligned with the direction of motion, and its tricky when the wind gusts are blowing the nose back and forth. Quite the challenge, but those are the moments pilots live for - to conquer the airplane even when the elements turn against us.
Tuesday, January 16, 2007
Density Altitude and True Airspeed
*NOTE TO PILOTS* This following post contains nothing new that you haven't already learned. Feel free to skip this one. It is simply an explanation of Density Altitude to enlighten the non-pilot readers, which, I think at this point is all of them. ;)
Density Altitude is a phenomenon that is drilled into every pilot's head right from the start. Defined it would be the altitude that a given mass of air most closely resembles in terms of the air density of the Standard Atmosphere. Simply speaking, that means that if the density altitude of the air at sea level is 2000 ft, it more closely compares to the air density a Standard Atmosphere would have at 2000 ft. A Standard Atmosphere is simply the yardstick aviation uses to compare the properties of air from day to day. A Standard Atmosphere is where at sea level the air temperature is 15° C. Now as we know as air becomes warmer it becomes less dense. That would mean that a 20° C day would have a higher density altitude then a Standard Day. Humidity also affects density altitude - the more humid the air, the less dense it is.
This matters to pilots because an airplane's performance is very closely related to the density altitude. The thinner the air becomes, the less power the engines are able to produce, and the less lift the wings produce. Thin air can also be a good thing, because with it comes less drag, so airplanes are able to fly faster with less resistance meaning better fuel economy. Thinner air also means that all the V-speeds increase. Vs (Stall speed) is higher, Vy (Speed for best climb rate) is higher, Vr (takeoff rotation speed) is higher, etc. It is important to note that it is the True Airspeed (TAS) that is higher, the V speeds in terms of Indicated Airspeed (IAS), which is speed read off the the airspeed indicator, do not change. That is because all IAS is is a reading of pressure difference between normal atmospheric pressure (static pressure) and the ram air pressure measured in the pitot tube. That means it doesn't matter if the air density changes, the difference stays the same. TAS is the speed at which the airplane is actually moving through the air. TAS increases as Density Altitude increases.
This all means that in a high Density Altitude situation, like on a hot 30° C, high humidity day, the airplane is going to be producing less power, and need to accelerate to a higher True Airspeed to take-off. Climb Performance will also suffer. That is why the effects of Density Altitude are drilled into pilot's heads. If they do not calculate the Density Altitude, and apply it to their airplane, they could very well end up expecting the airplane to perform better then it is able, resulting in running out of runway on take-off, or not being able to climb above the trees in time. When an airplane's ceiling is mentioned, that altitude is in Density Altitude. The airplane doesn't really care what altitude it actually is at, only the altitude it thinks its at. If we're overflying a mountainous ridge for example, with the peak at 12000' true altitude, and the airplane's ceiling is listed as 14,000', on a Standard Day of 15° the airplane should be able to fly over the mountains, but if its a hot, humid day, with a Density altitude at sea level of 3000', that means the airplane will perform as if its 3000' higher then it actually is. Meaning it will only be able to climb to 11,000' and it won't make it over the 12,000' mountain.
Density Altitude is a very important concept for a pilot.
Density Altitude is a phenomenon that is drilled into every pilot's head right from the start. Defined it would be the altitude that a given mass of air most closely resembles in terms of the air density of the Standard Atmosphere. Simply speaking, that means that if the density altitude of the air at sea level is 2000 ft, it more closely compares to the air density a Standard Atmosphere would have at 2000 ft. A Standard Atmosphere is simply the yardstick aviation uses to compare the properties of air from day to day. A Standard Atmosphere is where at sea level the air temperature is 15° C. Now as we know as air becomes warmer it becomes less dense. That would mean that a 20° C day would have a higher density altitude then a Standard Day. Humidity also affects density altitude - the more humid the air, the less dense it is.
This matters to pilots because an airplane's performance is very closely related to the density altitude. The thinner the air becomes, the less power the engines are able to produce, and the less lift the wings produce. Thin air can also be a good thing, because with it comes less drag, so airplanes are able to fly faster with less resistance meaning better fuel economy. Thinner air also means that all the V-speeds increase. Vs (Stall speed) is higher, Vy (Speed for best climb rate) is higher, Vr (takeoff rotation speed) is higher, etc. It is important to note that it is the True Airspeed (TAS) that is higher, the V speeds in terms of Indicated Airspeed (IAS), which is speed read off the the airspeed indicator, do not change. That is because all IAS is is a reading of pressure difference between normal atmospheric pressure (static pressure) and the ram air pressure measured in the pitot tube. That means it doesn't matter if the air density changes, the difference stays the same. TAS is the speed at which the airplane is actually moving through the air. TAS increases as Density Altitude increases.
This all means that in a high Density Altitude situation, like on a hot 30° C, high humidity day, the airplane is going to be producing less power, and need to accelerate to a higher True Airspeed to take-off. Climb Performance will also suffer. That is why the effects of Density Altitude are drilled into pilot's heads. If they do not calculate the Density Altitude, and apply it to their airplane, they could very well end up expecting the airplane to perform better then it is able, resulting in running out of runway on take-off, or not being able to climb above the trees in time. When an airplane's ceiling is mentioned, that altitude is in Density Altitude. The airplane doesn't really care what altitude it actually is at, only the altitude it thinks its at. If we're overflying a mountainous ridge for example, with the peak at 12000' true altitude, and the airplane's ceiling is listed as 14,000', on a Standard Day of 15° the airplane should be able to fly over the mountains, but if its a hot, humid day, with a Density altitude at sea level of 3000', that means the airplane will perform as if its 3000' higher then it actually is. Meaning it will only be able to climb to 11,000' and it won't make it over the 12,000' mountain.
Density Altitude is a very important concept for a pilot.
Balanced Field Length
There is a term in multi-engine flying called balanced field length. The balanced field length is the length of the runway required for a twin to operate safely with an engine failure at any point during the take-off phase. This is different then the more common "Takeoff Ground Run Distance" used in single engine flying. Takeoff Ground Run Distance is the minimum distance it takes an airplane (single or twin) to accelerate from 0 mph to when its wheels leave the ground. For the Cessna 150 at gross weight, at a sea level density altitude with zero headwind, the take-off distance is 735 ft. That means that in these conditions we should be able to use runways as small as 735 ft safely - if nothing goes wrong and the pilot does everything right on takeoff. In practice it is usually a good idea to stretch that length a little to leave some margin for error. Of course the more runway the better but endless amounts of runway is not always practical or possible. Therefore we use the takeoff ground-run distance, pulled off of a chart in the Pilot Operating Handbook, as a guideline as to how much runway we need.
Balanced field length is a little different then takeoff ground run distance. The Balanced field length as I mentioned at the beginning takes into account the runway needed to operate a twin engine airplane safely even if it were to have an engine failure at any point during the take-off. That means adding on extra runway length to account for having to stop the airplane if an engine were to fail during the takeoff roll on the ground, or in the case of larger airplanes, the extra length required to continue accelerating to takeoff if there is no longer enough distance to stop.
Larger airplanes use a pre-flight calculated V speed, denoted V1, as their takeoff decision speed. If an engine fails below this speed they are going slow enough and have enough runway to shut down the remaining engines and stop. Above this speed, and they no longer have the space to stop and are therefore committed to taking off, even if they're still on the ground. In a light twin such as ours, we don't use the V1 system because the airplane doesn't have the power to continue a takeoff on only one engine if we're still on the ground. This means that if we are still on the ground with an engine failure, we have no choice but to retard the throttles and stop. We may also even have to re-land and stop on the remaining runway if we have just taken off and have an engine failure before we have attained our best rate of climb speed and have the landing gear up. The landing gear down causes extra drag and our airplane may not be able to climb on only one engine with it down. Therefore our light twin balanced field length takes this into account. Many light twins have Accelerate-Stop charts in their Flight Manuals, which denote how much distance will be used to accelerate to a given airspeed, and then slow to a stop. My Twin Comanche doesn't have a chart like this, so we are forced to estimate it... OR, like I have just spent my entire last night doing, we can develop our OWN accelerate-stop distance charts using two different charts given in our Flight Manual, and a little math.
The chart I have just developed, I should point out, is an unapproved aircraft performance chart, and it has been untested. So I would certainly not wager mine or my passengers lives on it. It did however serve to be good brain excercise, and I do think it would probably fairly accurate if it actually was tested.
So here's what I did. Please any math/physics savey readers who have some suggestions/comments/rebutals, please, by all means, speak up. Anyways, my existing flight manual has two charts I used data from: Takeoff Ground Run Distance, which gives the distance required to accelerate to 80 mph and liftoff, and the Landing Ground Run Distance, which gives the distance required to stop given a touchdown speed of 70 mph. Now we can't really just add these two distances together, because they are in reference to two different speeds, and the resulting distance also wouldn't account for the extra distance we'd need if we were lifted-off, but still accelerating just above the the runway to our best rate of climb speed (Vy) of 112 mph, as is standard takeoff procedure (Accelerate to Vr of 80 mph, rotate and liftoff, accelerate just above the runway to Vy of 112 mph, climb out at that speed and retract the gear). So first of all we need to extrapolate the distances to a higher airspeed. To do this, we have to find our curve of acceleration, which I have charted on a Speed vs Distance graph. Since we know the engines are outputting a constant force, and we know that as speed increases, drag increases to the square of speed, so I think a curve somewhere along the lines of D=V^2 should be a good representative of both acceleration and deceleration seperately, where D equals distance travelled and V equals aircraft speed. I also had to calculate a stretch factor to make the curve fit the data given in the Flight Manual. To do that I used the speed given, divided by the distance given to calculate a stretch factor to make the curve fit the data. I then divided the stretch factor into the calculated speed, giving me this:
Dc = Vc^2/(Vg^2/Dg)
Where:
Dc = Distance calculated
Vc = Speed calculated
Vg = Speed given in charts
Dg = Distance given in charts
Now I can go to the charts in the flight manual to look up the distance needed to accelerate to 80 mph with a given aircraft weight in a given density altitude, to calculate the estimated distance to accelerate to a higher airspeed. For my chart I chose to calculate the distance needed to accelerate to 100 mph. I chose that airspeed because our best rate of climb with a single engine operating is 105 mph, so below that we would have to be able to stop, above 100 mph, we should be able to accelerate the last 5 mph and climb out.
So then I had to go through each density altitude and weight combination listed in the flight manual charts, find the resulting distance to accelerate to 80 mph, and plug that into my formula. Example:
2000 ft density altitude, at gross weight, showed 1500 ft ground roll to 80 mph.
Dc = Vc^2/(Vg^2/Dg)
Dc = 100^2/(80^2/1500)
Dc = 2344 ft required to accelerate to 100 mph.
I then used virtually the exact same method to calculate stopping distance from 100 mph, and added the accelerate and stop distances together, to get my estimated balanced field length.
That would mean that IF (big if) the formula is correct, I would be able to use a runway as short as the calculated balanced field length and I could have an engine failure at any point during the take-off and still have enough runway to safely land and stop below 100 mph or climb away above that speed.
Like I said that was simply a problem I did for fun and there is no guarentee those numbers are correct even IF my understanding of math and physics is correct. So I would never actually try to pass them off as true, and wouldn't recommend myself or anyone else try to use this method.
Balanced field length is a little different then takeoff ground run distance. The Balanced field length as I mentioned at the beginning takes into account the runway needed to operate a twin engine airplane safely even if it were to have an engine failure at any point during the take-off. That means adding on extra runway length to account for having to stop the airplane if an engine were to fail during the takeoff roll on the ground, or in the case of larger airplanes, the extra length required to continue accelerating to takeoff if there is no longer enough distance to stop.
Larger airplanes use a pre-flight calculated V speed, denoted V1, as their takeoff decision speed. If an engine fails below this speed they are going slow enough and have enough runway to shut down the remaining engines and stop. Above this speed, and they no longer have the space to stop and are therefore committed to taking off, even if they're still on the ground. In a light twin such as ours, we don't use the V1 system because the airplane doesn't have the power to continue a takeoff on only one engine if we're still on the ground. This means that if we are still on the ground with an engine failure, we have no choice but to retard the throttles and stop. We may also even have to re-land and stop on the remaining runway if we have just taken off and have an engine failure before we have attained our best rate of climb speed and have the landing gear up. The landing gear down causes extra drag and our airplane may not be able to climb on only one engine with it down. Therefore our light twin balanced field length takes this into account. Many light twins have Accelerate-Stop charts in their Flight Manuals, which denote how much distance will be used to accelerate to a given airspeed, and then slow to a stop. My Twin Comanche doesn't have a chart like this, so we are forced to estimate it... OR, like I have just spent my entire last night doing, we can develop our OWN accelerate-stop distance charts using two different charts given in our Flight Manual, and a little math.
The chart I have just developed, I should point out, is an unapproved aircraft performance chart, and it has been untested. So I would certainly not wager mine or my passengers lives on it. It did however serve to be good brain excercise, and I do think it would probably fairly accurate if it actually was tested.
So here's what I did. Please any math/physics savey readers who have some suggestions/comments/rebutals, please, by all means, speak up. Anyways, my existing flight manual has two charts I used data from: Takeoff Ground Run Distance, which gives the distance required to accelerate to 80 mph and liftoff, and the Landing Ground Run Distance, which gives the distance required to stop given a touchdown speed of 70 mph. Now we can't really just add these two distances together, because they are in reference to two different speeds, and the resulting distance also wouldn't account for the extra distance we'd need if we were lifted-off, but still accelerating just above the the runway to our best rate of climb speed (Vy) of 112 mph, as is standard takeoff procedure (Accelerate to Vr of 80 mph, rotate and liftoff, accelerate just above the runway to Vy of 112 mph, climb out at that speed and retract the gear). So first of all we need to extrapolate the distances to a higher airspeed. To do this, we have to find our curve of acceleration, which I have charted on a Speed vs Distance graph. Since we know the engines are outputting a constant force, and we know that as speed increases, drag increases to the square of speed, so I think a curve somewhere along the lines of D=V^2 should be a good representative of both acceleration and deceleration seperately, where D equals distance travelled and V equals aircraft speed. I also had to calculate a stretch factor to make the curve fit the data given in the Flight Manual. To do that I used the speed given, divided by the distance given to calculate a stretch factor to make the curve fit the data. I then divided the stretch factor into the calculated speed, giving me this:
Dc = Vc^2/(Vg^2/Dg)
Where:
Dc = Distance calculated
Vc = Speed calculated
Vg = Speed given in charts
Dg = Distance given in charts
Now I can go to the charts in the flight manual to look up the distance needed to accelerate to 80 mph with a given aircraft weight in a given density altitude, to calculate the estimated distance to accelerate to a higher airspeed. For my chart I chose to calculate the distance needed to accelerate to 100 mph. I chose that airspeed because our best rate of climb with a single engine operating is 105 mph, so below that we would have to be able to stop, above 100 mph, we should be able to accelerate the last 5 mph and climb out.
So then I had to go through each density altitude and weight combination listed in the flight manual charts, find the resulting distance to accelerate to 80 mph, and plug that into my formula. Example:
2000 ft density altitude, at gross weight, showed 1500 ft ground roll to 80 mph.
Dc = Vc^2/(Vg^2/Dg)
Dc = 100^2/(80^2/1500)
Dc = 2344 ft required to accelerate to 100 mph.
I then used virtually the exact same method to calculate stopping distance from 100 mph, and added the accelerate and stop distances together, to get my estimated balanced field length.
That would mean that IF (big if) the formula is correct, I would be able to use a runway as short as the calculated balanced field length and I could have an engine failure at any point during the take-off and still have enough runway to safely land and stop below 100 mph or climb away above that speed.
Like I said that was simply a problem I did for fun and there is no guarentee those numbers are correct even IF my understanding of math and physics is correct. So I would never actually try to pass them off as true, and wouldn't recommend myself or anyone else try to use this method.
Saturday, January 13, 2007
Bad Habits
I went twin flying again this Friday during my lunch. The weather was a 1600 ft ceiling, and we had some light rain here and there, so we just did circuits. Runway 27 at London is long enough for touch and goes, so that's what we were doing.
The proper procedure for touch and goes is fairly simple, after all three wheels are down, flaps come up, and you go to full power and start your takeoff again, without stopping. I learned a hard lesson about procedures done in the right order. Flying touch and goes in the Cessna 150, the proper procedure is still flaps up, power to full (and then carb heat as well), but since its a slower airplane, with less power, and less travel throttle, you can sometimes get away with going to full power first, and then bringing the flaps up. That's simply because it doesn't take very long to push the power in and a Cessna 150 doesn't accelerate very fast either, so there's plenty of time to do it in either order before the airplane wants to go flying. However in the Comanche, the process of going to full power takes around 4-5 seconds from idle, and the airplane accelerates very rapidly.
Now this landing yesterday I had just touched down with a little bit of power, and while we were rolling along, I decided I'd push the power forward first and get us accelerating first to save us runway and then I'd bring up the flaps. That was my first mistake. As we started to accelerate and my hand was still on the throttle the airplane started to veer back and forth almost uncontrollably left and right. What was happening was what's called wheelbarrowing. That is when the weight comes off the main wheels, or off the ground completely, and shifts to the nose wheel. This can happen in any airplane from the pilot trying to hold it on the ground when the airplane wants to go/stay flying. In the Comanche due to the nosegear being longer then the mains, it can also happen if you try to takeoff with flaps. Normally in the Twin Comanche with no flaps rotation speed is around 90 mph, and the airplane will come off the ground with very little back pressure. So since we had the flaps down, it was trying to come off the ground much slower. It was essentially lifting most of the weight off the main wheels but keeping the nose down, since flying with flaps causes a much more nose down attitude. If I had immediately recognized my mistake I could have given some back pressure, gotten airborne, and we'd have gone flying. Instead I fought to maintain control on the ground because we hadn't reached the Vr (rotation speed) I had in my head. As this was all going on I think I said something like this, "Power to full... whoa... what the heck is happening!? ... flaps up!" My instructor, Richard, answered my question about the same time I did, and he flicked the flaps up for me. At that point we became airborne and everything turned out ok. I turned to Richard after during the climbout and said sheepishly, "That was pretty scary!". He just smiled at me and didn't say anything, aware that I knew where I had gone wrong.
That was a little bit of a lesson the hard way on bad habits. Flying a slow, forgiveable airplane its easy to get into bad habits, like following procedures in the wrong order. A Cessna 150 will let you get away with it, but a faster airplane like the Twin Comanche will bite you. The moral of the story is follow the proper procedures in the right order!
The proper procedure for touch and goes is fairly simple, after all three wheels are down, flaps come up, and you go to full power and start your takeoff again, without stopping. I learned a hard lesson about procedures done in the right order. Flying touch and goes in the Cessna 150, the proper procedure is still flaps up, power to full (and then carb heat as well), but since its a slower airplane, with less power, and less travel throttle, you can sometimes get away with going to full power first, and then bringing the flaps up. That's simply because it doesn't take very long to push the power in and a Cessna 150 doesn't accelerate very fast either, so there's plenty of time to do it in either order before the airplane wants to go flying. However in the Comanche, the process of going to full power takes around 4-5 seconds from idle, and the airplane accelerates very rapidly.
Now this landing yesterday I had just touched down with a little bit of power, and while we were rolling along, I decided I'd push the power forward first and get us accelerating first to save us runway and then I'd bring up the flaps. That was my first mistake. As we started to accelerate and my hand was still on the throttle the airplane started to veer back and forth almost uncontrollably left and right. What was happening was what's called wheelbarrowing. That is when the weight comes off the main wheels, or off the ground completely, and shifts to the nose wheel. This can happen in any airplane from the pilot trying to hold it on the ground when the airplane wants to go/stay flying. In the Comanche due to the nosegear being longer then the mains, it can also happen if you try to takeoff with flaps. Normally in the Twin Comanche with no flaps rotation speed is around 90 mph, and the airplane will come off the ground with very little back pressure. So since we had the flaps down, it was trying to come off the ground much slower. It was essentially lifting most of the weight off the main wheels but keeping the nose down, since flying with flaps causes a much more nose down attitude. If I had immediately recognized my mistake I could have given some back pressure, gotten airborne, and we'd have gone flying. Instead I fought to maintain control on the ground because we hadn't reached the Vr (rotation speed) I had in my head. As this was all going on I think I said something like this, "Power to full... whoa... what the heck is happening!? ... flaps up!" My instructor, Richard, answered my question about the same time I did, and he flicked the flaps up for me. At that point we became airborne and everything turned out ok. I turned to Richard after during the climbout and said sheepishly, "That was pretty scary!". He just smiled at me and didn't say anything, aware that I knew where I had gone wrong.
That was a little bit of a lesson the hard way on bad habits. Flying a slow, forgiveable airplane its easy to get into bad habits, like following procedures in the wrong order. A Cessna 150 will let you get away with it, but a faster airplane like the Twin Comanche will bite you. The moral of the story is follow the proper procedures in the right order!
Wednesday, January 10, 2007
How different wing types affect handling
The shape of an airplane's wing can do a whole lot for how an airplane performes, and handles. Aircraft designers take into the account the aircraft's mission: Trainer, cross country machine, aerobatic aircraft, or in many cases some combination between two, or all of those categories.
 The wing camber refers to the shape of the wing if you were looking at it from the end. A high cambered wing is very curved on the top, and thick from top to bottom, whereas a low camber refers to a very flat wing. A common misconception is that a high cambered wing produces more lift. While this is right I suppose in a roundabout way, that specific wording is rather misleading. The thicker camber improves airflow at high angles of attack, therefore a thicker wing will be able to fly at a higher angle of attack without stalling. The higher angle of attack is what actually produces more lift. Camber can also be on the bottom of the wing, which improves airflow when the wing is inverted during aerobatic flight. A camber is NOT required to produce lift. Another flat out wrong concept that is taught is that the air on the top of the wing has to meet up with the air on the bottom. That's not true, in fact, since the air on the top is accelerated, it actually ends up further back then the air on the bottom. This is due to a concept called circulation, which I am not going to take the time to explain. For more information, check out this great website.
So a thicker camber has two effects: It allows the aircraft to fly at higher angles of attack which produces more lift - and it also increases drag. A thinner camber is just the opposite, less lift, less drag. The more lift a wing produces, the slower the stall speed will be.
The wing chord refers the distance between the leading edge and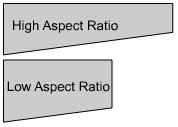 trailing edge of the wing. And the aspect ratio refers to the ratio between the wing chord and wing length. A high aspect ratio, between a long, thin wing (from front to back) actually produces LESS induced drag (drag produced as a side-effect of lift) then a low aspect ratio wing. That's why you always see gliders with incredibly long, thin wings, to produce the most lift possible with the least amount of drag. The shorter wing in a low aspect configuration generally gives greater roll rates, and the shorter wing means stronger construction.
There is one last term we'll go over before we start putting together all these different aspects of wing design together. That is wing washout. A washed out wing has a certain amount of twist built into it. The farther you get to the tip, the more the wing is twisted with its leading edge down. What this serves to do is increase the angle of attack of the wing near its root, and decrease it near the tips. Now if you remember, a wing will stall at a certain angle of attack, usually around 16-18 degrees (depending on the camber). That means that if the wing root has a greater angle of attack, it will stall first, and then the stall will work its way out to the tips. This has two advantages: The ailerons, which are on the outermost portion of the wing, will still have an affect even when the innermost portion of the wing has stalled. This helps to maintain control of the aircraft. Also, it makes for a much gentler stall when part of the wing stalls first, and the stall works its way across the rest of the wing. This is preferable to the entire wing stalling at the same time, and dropping like a rock. Nearly all wings have some sort of washout designed into them, and its disadvantages, as far as practical flight handling goes, are negligable. Therefore this is far as they will be discussed at this point.
Airplanes designed as a high speed cross country machine usually use high-aspect ratio, low camber wings. The long slender, thin airfoil gives lots of lift and very little drag; perfect for efficient cruising, however the sacrifice is made in slow speed handling and can often be tricky to l and. The thin camber generally gives abrupt, unforgiving stalls at higher airspeeds then a thicker camber, and the minimized drag means it takes a long time to slow down. This requires more planning during the landing phase. It also means that if airspeed is not precisely controlled, a too fast approach will cause the airplane to float in the flare, chewing up runway until the airspeed dissipates. The Piper Twin Comanche, and any Mooney aircraft are great examples of high-aspect, low camber wings.
 The wing camber refers to the shape of the wing if you were looking at it from the end. A high cambered wing is very curved on the top, and thick from top to bottom, whereas a low camber refers to a very flat wing. A common misconception is that a high cambered wing produces more lift. While this is right I suppose in a roundabout way, that specific wording is rather misleading. The thicker camber improves airflow at high angles of attack, therefore a thicker wing will be able to fly at a higher angle of attack without stalling. The higher angle of attack is what actually produces more lift. Camber can also be on the bottom of the wing, which improves airflow when the wing is inverted during aerobatic flight. A camber is NOT required to produce lift. Another flat out wrong concept that is taught is that the air on the top of the wing has to meet up with the air on the bottom. That's not true, in fact, since the air on the top is accelerated, it actually ends up further back then the air on the bottom. This is due to a concept called circulation, which I am not going to take the time to explain. For more information, check out this great website.
So a thicker camber has two effects: It allows the aircraft to fly at higher angles of attack which produces more lift - and it also increases drag. A thinner camber is just the opposite, less lift, less drag. The more lift a wing produces, the slower the stall speed will be.
The wing chord refers the distance between the leading edge and
 trailing edge of the wing. And the aspect ratio refers to the ratio between the wing chord and wing length. A high aspect ratio, between a long, thin wing (from front to back) actually produces LESS induced drag (drag produced as a side-effect of lift) then a low aspect ratio wing. That's why you always see gliders with incredibly long, thin wings, to produce the most lift possible with the least amount of drag. The shorter wing in a low aspect configuration generally gives greater roll rates, and the shorter wing means stronger construction.
There is one last term we'll go over before we start putting together all these different aspects of wing design together. That is wing washout. A washed out wing has a certain amount of twist built into it. The farther you get to the tip, the more the wing is twisted with its leading edge down. What this serves to do is increase the angle of attack of the wing near its root, and decrease it near the tips. Now if you remember, a wing will stall at a certain angle of attack, usually around 16-18 degrees (depending on the camber). That means that if the wing root has a greater angle of attack, it will stall first, and then the stall will work its way out to the tips. This has two advantages: The ailerons, which are on the outermost portion of the wing, will still have an affect even when the innermost portion of the wing has stalled. This helps to maintain control of the aircraft. Also, it makes for a much gentler stall when part of the wing stalls first, and the stall works its way across the rest of the wing. This is preferable to the entire wing stalling at the same time, and dropping like a rock. Nearly all wings have some sort of washout designed into them, and its disadvantages, as far as practical flight handling goes, are negligable. Therefore this is far as they will be discussed at this point.
Airplanes designed as a high speed cross country machine usually use high-aspect ratio, low camber wings. The long slender, thin airfoil gives lots of lift and very little drag; perfect for efficient cruising, however the sacrifice is made in slow speed handling and can often be tricky to l
 and. The thin camber generally gives abrupt, unforgiving stalls at higher airspeeds then a thicker camber, and the minimized drag means it takes a long time to slow down. This requires more planning during the landing phase. It also means that if airspeed is not precisely controlled, a too fast approach will cause the airplane to float in the flare, chewing up runway until the airspeed dissipates. The Piper Twin Comanche, and any Mooney aircraft are great examples of high-aspect, low camber wings.
Airplanes designed to have friendlier handling characteristics often sacrifice efficiency and speed during the cruise. Training aircraft like the Piper Tomahawk and many "step-up" aircraft like the Piper Arrow I and II use a low aspect ratio, high camber wing. The thicker camber may limit the cruise speed a little bit more, but these airfoils make for a more docile airplane. Stalls occur at a much slower speed, and are less violent of an event. The drag caused by the thicker profile and 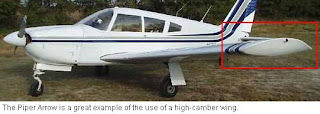 higher induced drag cause the airplane to slow down much quicker, and the short wings will make it sink faster. This makes the landing phase much easier to deal with. Less then perfect airspeed control is not as much of an issue since excess airspeed will be bled off much quicker, giving a greater margin for error.
 higher induced drag cause the airplane to slow down much quicker, and the short wings will make it sink faster. This makes the landing phase much easier to deal with. Less then perfect airspeed control is not as much of an issue since excess airspeed will be bled off much quicker, giving a greater margin for error.
If its load hauling you want the high-camber, high aspect wing ratio is the way to go, like on the Piper Aztec. The high camber allows higher angles of attack translating into more lift, and the high aspect ratio helps maximize lift while minimizing drag.
So designers take into account what mission they believe the aircraft primarily be serving in: Trainer, High Speed Cruiser, Load Hauling, or a step-up airplane somewhere in between. And we as pilots can often tell how the airplane will handle and perform just by looking at the wing and understanding how it works.
Subscribe to:
Posts (Atom)